Productivity Tips

Here's how I am writing my goals for work and life in 2021.

I am finally facing “Goal Writing”.

I have never loved writing and sharing my goals. At Salesforce I struggled to connect with their V2MOM - in hindsight the V2MOM is fantastic. And at IBM my blood pressure has risen every time I’ve opened our Checkpoint tool (until today! It’s finally working right).

About a month ago I watched a video that really helped me understand both how and why to write down goals in a way that spoke to me. I want to share that inspiration and my template. I am finally eager to write goals down and share them with others.

I will try to revisit this post throughout the year to share what I add or take away from this process.


My Goal Template

Goal title
State this as a dream or emotional statement.

Date Due: Be S.M.A.R.T. and time-bound the goal 😉

Public: Yes/No (You can share goals in the new IBM tool, and I believe most goals are better shared).

My version of the Anti-Wasteman Model

Why:

Why spend time to accomplish this? What will help you know you achieved the goal Include Targets/Measures

How Surprised will I be if I do not achieve this goal? 

(No surprise if I fail, 10, sure it will happen)

Top 3 Reasons for failure:

This aligned with the “O'“ in V2MOM… Obstacles have to be acknowledged. Sometimes progress on overcoming an obstacle is more valuable than the goal, esp. when your work unblocks your peers.

Who can help?

One of the smarter questions, never battle alone, have people to help you stay accountable to your goals

How can I stack the deck in my favor?

Action (right now)

My Metadata

In our system at IBM, I want to align with our leadership's goals. I am mapping my goals to our CMO’s goals and noting that with a simple line at the beginning of the description.

Further, I am aligning to the 5 dimensions that we’ve used to guide our goals since I joined IBM. I am using the hashtag for now as there is not a place to input the dimensions.

#ClientSuccess

#BusinessResults

#Innovation

#ResponsibilityToOthers

#Skills

This is the first year I have approached goal writing with a plan that I am excited about and believe can work. If you have ideas, tips, or inspiration you want to share, I would love to hear from you.

 

Four things that help me get the most out of my iOS experience.

Four things that help me get the most out of my iOS experience

Plus a bonus tip for podcast listeners.

Type less, faster and smarter. Use Text Replacement

I use text replacement so I do’t have to type out common things like my email, phone, address and common replies. 

You’ve likely seen this on your phone if you are typing “on my way” or “omw” and see that phrase ready for you to use (though Apple puts an explanation mark in the phrase).

Having some of these pieces of information or phrases at the ready is great. You have to type less, make fewer errors and can finish replies faster, though you do have to remember your shortcuts. Plus if you use iCloud these text replacements will sync across your devices.

For example when I type in “pn” text replacement expands those two letters out to my entire phone number. The same effect also works for my address (I use “addy” if you are curious). And for my various email addresses, I use a letter plus “ml”. For my Gmail address its “gml”, for IBM, its “iml”.

My latest use is for “a dad joke on demand”. I have grown (groan?) rather fond of dad jokes and now get asked for a joke more often than expected… with “jk1” you get “What do you call a guy with no shins? NEIL!!!!” My thanks to CNN’s dad joke generator for that gem!

Other uses you might consider:

  • Conference line + dial in code for work calls

  • Common misspelled words

  • Contact info — address, email, phone number

  • Common replies for emails

  • Common searches (“coffee shop near me” or “Apple stock price”)

I am sure there are may other ideas you are having, so, while you are thinking about it, here are instructions to help you out.

Go to Settings > General > Keyboard > Text Replacement. In the upper right corner tap the plus (+) sign. Type in your phrase and optionally (though I highly recommend it), your shortcut. Tap Save. That is it. If you come up with some great use cases, let me know in the comments.

1*jPJwZe605SnC41gS36mFrA.png

Instructions: Text Replacement for iPhone

1*r6D0-ERMNiAU16GCMGza5Q.png

Instructions: Text Replacement for iPhone

Listen. Use Speak Screen to make your device read to you.

When I was working as a manager at Salesforce I had a 43-minute commute into downtown Indy and a 43-minute commute home. At the time I needed to go through a lot of emails (a global team never sleeps) and I figured out a way to get my iPhone to read to me while I drove. I found that if I used an accessibility feature called Speak Screen it did the trick.

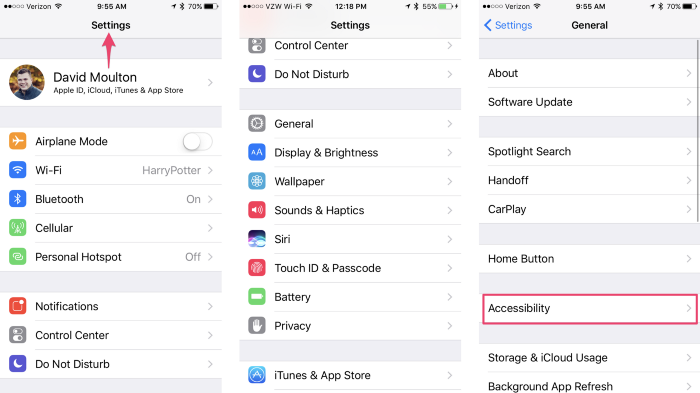
Go go Settings > General > Accessibility > Speech. On the Speech screen tap the Speak Screen toggle to on. You will see the instructions “Swipe down with two fingers from the top of the screen to hear the contents of the screen.”

In the screen shots below, you will see that one is in the Notes app. That is my iPhone reading to me. The turtle and rabbit are speed controls. I like to tap the rabbit a couple times and listen as fast as I can. It takes a little time to develop an ear for it, but when you have 43 minutes to “read” an entire inbox you learn to hear faster.

1*hxbAhYCl3jw0fPgNhzpIuA.png

Instructions: Use Speak Screen

1*-28PCz1aFvXLeOpZ72w7MA.png

Instructions: Use Speak Screen

Speaking of listening faster, I try to listen to a couple podcasts per day. I am a huge fan of Overcast by Marco Arment. The app is a joy to use and saves me a ton of time. 

First I set custom speeds for each show. I like to listen to my podcasts a bit faster than normal. So for a show like Roman Mar’s 99& Invisible, I crank things up to nearly 2x speed. Roman speaks very deliberately and very slowly so this works. Other shows, like RadioLab, don’t speed up well. The background music beds, sounds and layers of human voices start to blur to a point where I can no longer enjoy the show.

Next, I turn on Smart Speeds and Voice Boost. Smart Speeds, which according to the note in the app’s Settings has saved me 14 hours beyond speed adjustments. This is incredible to think about. Had I just listened to the podcasts I love sped up, I would have listened to 14 days of nothing. 14 days of silence (not a bad movie title there). Two weeks of empty! Anyway, you get the idea, Smart Speed “dynamically shortens silences in talk shows”. For me, that is amazing!

Voice Boost is also a great feature that really works. As the site says, “boost and normalize volume so every show is loud, clear, and at the same volume”. It works as advertised, I wish this was something that worked across the entire device. When I switch to Pandora or Spotify, the ads nearly always play louder. I know there is science to back up this user unfriendly choice, but it is so jarring that I often associate negative feelings with the product being advertised (hint hint).

1*iBxNOd3ZjaJVdaVF3XmGMA.png

Overcast. Awesome for podcasts

Give your eyes a break: Dim the screen waaay down.

When I’m in a dark room and I don’t want to disturb others or scorch my eyes I triple click to dim my screen to take the brightness incredibly low. Before you can get this to work you need to set it up.

Go to Settings > General > Accessibility. Scroll to the bottom of the screen to Accessibility Shortcut. Tap to open the list of shortcuts. Tap Zoom. Now, back out to the Accessibility view and scroll back up to the top. Look for and tap on Zoom. Scroll down until you see Zoom Region and Zoom Filter. Set your Zoom Region to Full Screen Zoom and the Zoom Filter to Low Light. Now try that triple click out. Your screen should be notably less bright. 

If you also see that the screen is zoomed in, you will need to use three fingers and triple tap on your screen. This should bring up the controller. Make sure the zoom slider is all the way to the left.

1*_rmCEKy1ZDtwkChnmAEYDg.png
1*4c74dIsjHGSKT7atBf4X_w.png
1*BMefk_IRAQJjoAi5lHxghg.png

Use location reminders like a pro

I use the built-in Reminders app to create tasks. I like to invoke Siri and make reminders, and I’ve had great luck creating location-specific reminders. To do this, just say “Siri, remind me to take my lunch bag out of my trunk when I get home” or Siri, remind me to send a text to my wife when I get to work”.

However, not all reminders are for arriving or leaving work or home. Sometimes I need to remember air filters when I get to Lowe’s or a birthday card at Target. To do this, I have to create these reminders in the app. 

To do this, go to Reminders App > Tap the plus (+) in the list you want to add a reminder >Type your reminder text > Tap on the “i” in the circle > Tap on the toggle to turn on “Remind me at a location” > Tap on Location (should show up under Remind me at a location). Now search for the location where you want the reminder. Tap the right location and tap “When I Arrive” or “When I Leave”. Now on the top left, tap Details to go back and then tap Done in the top right corner. 

While having at least ten taps to set up a location reminder is a UX issue that Apple needs to address, having a reminder like this save me from making a return trip to the hardware store or forgetting an important birthday card has been worth it. 

1*v-toYc0moGyDY2Ic-zmxyg.png
1*Yi5e5Trs9neHo_qB1sSt8w.png

I wish that I could say, “Hey Siri, when I get to Target, remind me about anyone’s upcoming birthdays that are in my favorites” and the app would create a location + data aware reminder that checked my favorite contacts and if I was near a Target, remind me to grab a card. But that is a future feature!

Those are the four iOS tips plus the recommendation to use Overcast if you listen to podcasts. I hope you find them as useful as I do. And, I am always looking for more ways to get more done or have a better experience with my iOS devices. Let me know what you’ve found helpful. 

In my next post, I want to share how I am using the Workflow app and IFTTT for more advanced functionality. My favorite / most lazy Workflow “app” allows me to remotely launch iTunes so we can watch the movies on my Mac. I got tired of having to go “all the way to my office” to flip on iTunes.